Prior to beginning work on my documentary, I feel that one of the aspects that I should learn more about, in order to help with the process, would be the filming of an interview. The interview portion of a documentary should be engaging so that it gets the audience to listen to what the interviewees are saying. However, the interview usually is not the main focus of the documentary and should not be presented as such.
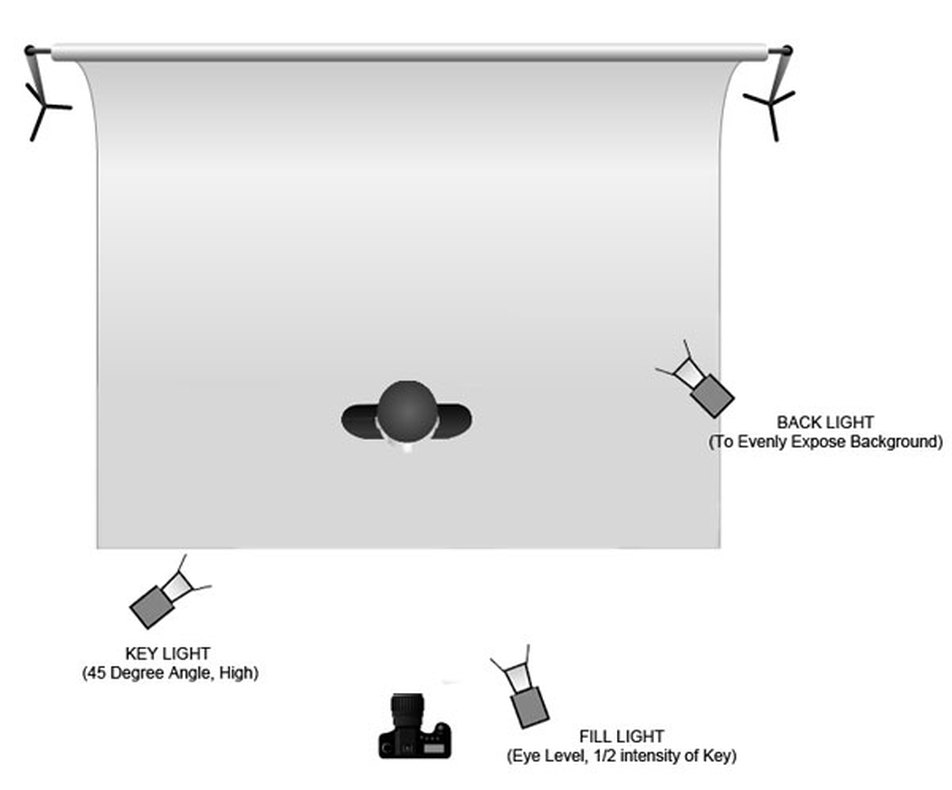 When lighting a setting for an interview, the most common setup uses three different lights known as three point lighting. Three point lighting makes use of a key light, fill light, and back light. The key light is intended to be the brightest source of light within the scene, pointing at a 45 degree angle on the subject. The fill light's purpose is to fill in the less lit portions of the scene. The fill light is meant to be not be as bright as the key light as to not over brighten the image. Lastly, the back light works to light the background, creating depth within the image between the background and the subject.
Lighting An Interview
 When lighting a setting for an interview, the most common setup uses three different lights known as three point lighting. Three point lighting makes use of a key light, fill light, and back light. The key light is intended to be the brightest source of light within the scene, pointing at a 45 degree angle on the subject. The fill light's purpose is to fill in the less lit portions of the scene. The fill light is meant to be not be as bright as the key light as to not over brighten the image. Lastly, the back light works to light the background, creating depth within the image between the background and the subject.
Making An Interview Look Interesting
Creating an interesting visual look for your interview helps to engross the audience with what is being said. Looking for a guide as to how to accomplish this, I came across this created video by the YouTube user "Indy Mogul". While the video goes in depth showing the entire process of setting up and interview, I took away a few specific details. The first being that the filmmaker should choose an interesting location for the interview to take place. The surroundings should create give depth to the interview and should try to relate to the topic of the interview. Next, the placement of the camera should work to highlight the subject. Putting the subject in the center of the frame creates a bland look. By adjusting the camera's positioning, the subject can be elevated and moved to the side of the frame in order to strengthen the presence of the subject. Also, the video included how the filmmaker should avoid close-ups as they make the scene feel "too dramatic". The last main detail I took away from the video was work with the person being interviewed. In order to get the best results, the interviewer should work to not engage too much within the conversation, letting the interviewee speak their mind.
Work Log
- Monday 9/30: Working to wrap up script
- Tuesday 10/1: Continued to wrap up script
- Wednesday 10/2: Script in "finished" state and began storyboard
- Thursday 10/3: Minor script adjustments and continued storyboard
- Friday 10/4: Continued storyboard and worked to communicate with actors for documentary
Comments
Post a Comment