
Pre-Production Blog Post 10/7

After working over the past few weeks to complete the pre-production stage of my project, the following is what I have accomplished.

Releases

The following are the releases that I have collected for this project. Three of these releases are talent releases for the the three actors who will appear in the documentary. These actors are all people who I personally know and are reliable enough to depend on for this project. The other release is a location release. The selected location for this film was my house. With my script being relatively simple and not requiring a large amount of locations, my property should be flexible enough to make the film come to life. Below is a link to pictures of my releases as it is difficult to insert pictures into Blogger without encountering formatting errors.
Releases Link

Storyboard

The storyboard that I have drawn for the documentary gives a basic view of what I would like the final product to look like. There were a few sections on the storyboard that I left vague. The reasoning behind this is because currently I know what I would like to insert in these sections however, I do not know what they should look like and likely won't know until I go and film.
Below is again a link to pictures of my storyboard.
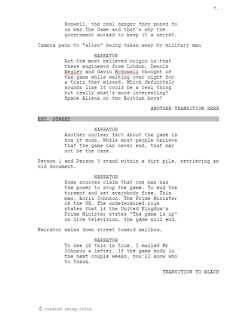
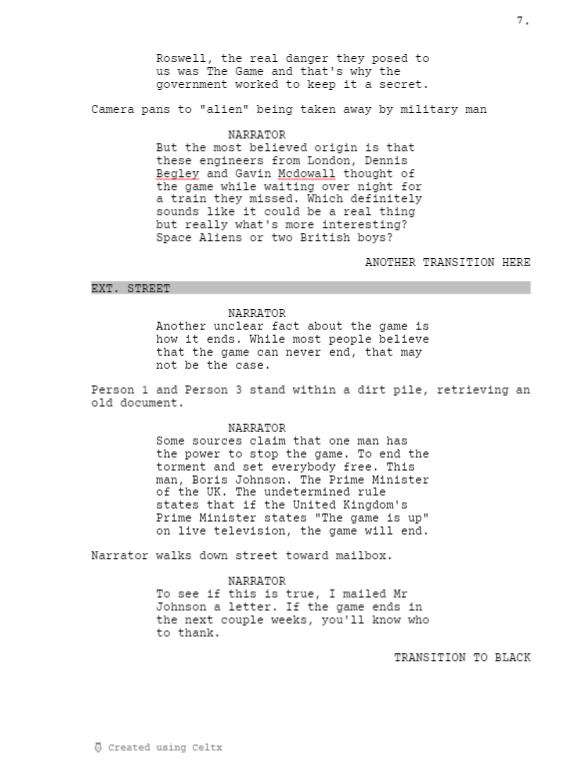
Script

My script for the documentary can be seen below. I do not consider myself a writer, but I feel that this script best represents what I would like to accomplish. I worked to create moments of comedy while also teaching about the focused topic. While I will largely stick to what I have written, I feel that it is likely that I will change and adapt portions of the script to better fit with what I am able to produce. If it is difficult to view the script on Blogger, below is a link to pictures of each page of the script.


Comments

Popular posts from this blog

Investigation 3/1: The Tools Of Camera Stability

One of the most important aspects of cinematography that goes commonly unnoticed is having the camera steady. Even a slight amount of movement within a shot can pull the audience away from the film, so it is important to attempt to have shots. There are multiple different ways that you can use to stabilize your camera, some of which are more effective than others. Tripod Using a tripod is the easiest way to stabilize the camera while filming. By having three points of contact with the ground, a tripod keeps the camera extremely stable. The camera would likely only move due to very large movements on the ground or strong winds. The one downside to using a tripod is that it has to remain stationary. If the required shot involves moving around, a tripod can likely not be used. Overall, the tripod is the easiest, simplest, and cheapest way to keep your camera steady. (Image Source) Shoulder Rig A shoulder mount is one way to keep the camera stable while also being able to mov...

Investigation 11/1: Rear Projection

Friday October 30th marked the release of the second season of the hit show The Mandalorian . While there are many things that contribute to how great of a show it is, the one aspect that has peaked my interest the most would have to be it's use of virtual sets. Virtual sets created in real time using the Unreal Engine makes the world of Star Wars  come alive on-screen at home and for the actors during filming. While the technology that creates virtual sets is amazing and will likely change the way that all films and shows are made, it is definitely something that smaller productions and individuals won't be able to make use of. Instead, the tool available to all film makers that I will be discussing today is Rear Projection. Why Use Rear Projection Rear Projection allows for a cheap and easy way to transform the background of your scenes. The concept of rear projection involves the projection of a pre-recorded video behind your actor. This allows for the actor to act within th...

Investigation 11/8: Steadicam Vs Tripod

Previously, I have investigated different tools you can use to stabilize your camera, which can be found  here . Since writing that blog post, I have had plenty of time to test using both my tripod and my Steadicam. While each of them is useful in certain scenarios, sometimes it is difficult to bring both pieces of gear with you for some shoots. For this reason, I have decided to compare the strengths of each to determine which is better for all-around shooting scenarios. Strengths Of A Tripod Using a tripod allows you to get the very smooth and stable shots with minimal effort. From my experience using my tripod, it has been most useful when I have been in front of the camera and unable to closely monitor how the shot looks. With the tripod being able to sit completely still without requiring someone to be near, it can completely replace a camera operator in some scenarios. Tripods also take the edge in smooth tilts and pans. While it is definitely possible to get stable pans and ...